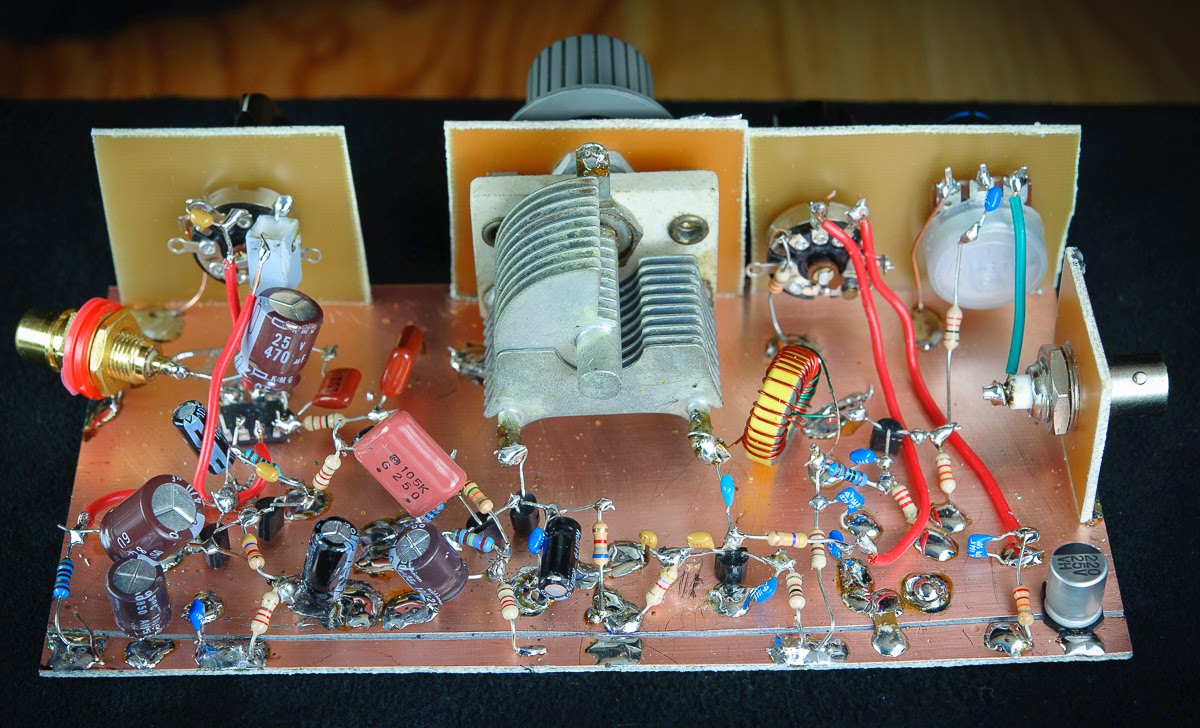
This Winter, after a ~4 year hiatus from regenerative receivers, I built 4 while studying the plethora of published designs in print and on the web. How do you describe the sounds that regens deliver? Perhaps the adjective "screechy", or adjective-verb phrase "alive with vibe" might do --- and when tuning across a SWL band they emit those classic wee-woo sounds that signal we're close to receiving some yet unknown, far off, station.
Many regen authors boast "high performance" or, like a Markov chain, their boosted outcome appears dependent on the state of whatever modulation mode your tuning -- or which knob your tweaking at the moment. Few measures are ever shown in the regen literature. Some designers embrace minimalism, while others unleash parts with fits of fury. Compromise, subjectivity, mysticism, sci-fi, nostalgia ---- it's all here. Joy.
As a mere regen receiver student, I'll offer my experiments with my regen #4 in hopes they might prove useful at some level.
My inspiration for this particular receiver comes from the work of simply amazing builder Makota, 7N3WVM. While a minimalist, his designs pitch common sense innovation and deliver maximum spark for us experimenters.
Makota's website: http://www.qsl.net/7n3wvm/
The base receiver for my design may be seen at http://www.qsl.net/7n3wvm/regen.html
It features a Colpitt's oscillator AC coupled to the tank for the Q multiplier plus a separate, low current FET detector. Many have copied/adapted his core regen design, including Dan, N1BYT in the WBR. Dan added his balanced LC circuit with ultra super-light coupling. Dave, AA7EE also applies a SPRAT fueled Makota design in his Sproutie receiver.
Above — The entire regen #4 schematic.
I'll discuss the stages from left to right.
RF Preamplifier
We hear it over and over --- regens leak RF from the tank to the 'tenna. The often used, common base, or common gate RF amplifier serves as my favorite way to boost antenna-to-tank isolation, plus allows the use of crappy antennas when antenna space gets constrained.
The 500 Ω pot also reduces leakage and I normally just open it "a crack" since my antenna is a full sized 1/4 wave vertical on the 40M Ham band and the preamp offers gain.
No question — if you run the RF gain pot too wide open -- on a strong signal, you may cream the otherwise well behaved regen circuitry and make some bad noises.
Above — The worst case antenna port leakage of regen #4: ~-41 dBm. In this experiment, I turned both the RF gain and the regen pots fully clockwise! The rig was writhing in spasm with such a setting --- normally both are set close to fully counter clockwise.
Above — Typical AM reception antenna port RF leakage. I listened to some AM stations like Radio Habana and others farther up the 49M band. With typical AM RF gain and regen control settings, the leakage out of the antenna connector was -73 dBm.
So the leakage will fall somewhere between the worst case and typical for AM reception -- I can live with that.
Feel free to drop the preamp current by increasing the 3K3 resistor. When I hear the word preamp, I think "run some current" -- even, still, it's just 2.24 mA.
Above — Regen #4 breadboard
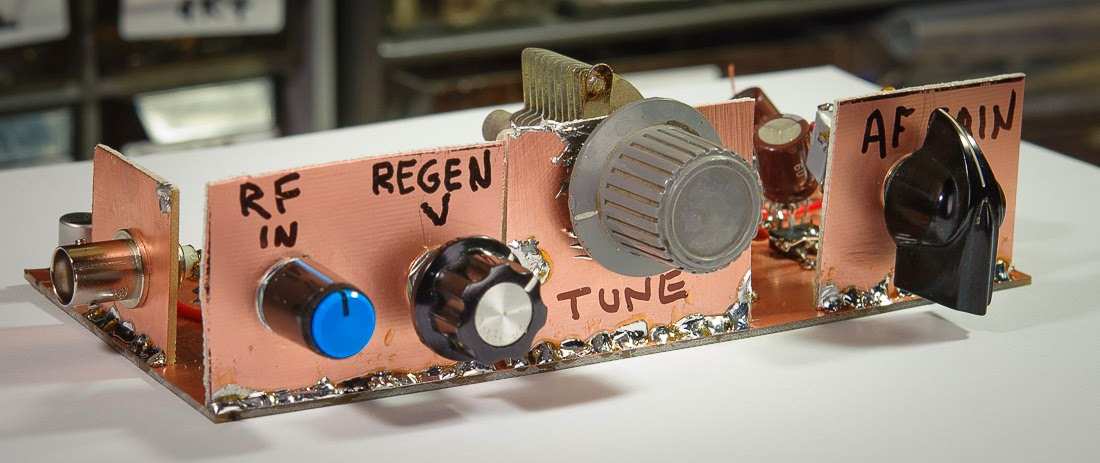
Above — Regen #4 breadboard front view. I once read you gotta run a chicken-head knob to really wrestle the audio pot into submission on a regen.
Tank and Q Multiplier
I ran a single, grungy, air-variable capacitor for tuning. My receiver tuned 6.69 - 9.2 MHz
but lacked the fine tuning needed for proper SSB and CW work. I suggest that builders apply standard VFO techniques like a few C0G/NP0 fixed capacitors for temperature stability and some way to provide fine tuning such as a small delta C capacitor in parallel with the other tank parts, or perhaps, a gear reduction tuning knob.
I can't stand temperature drift in my receivers, but varactor (or rectifier diode) tuning might work.
The 8:29 turns inductor ratio is ripe for experiments. As you reduce the smaller winding from 8 turns too a lower N, more of the RF amp's signal will shunt to ground via the collector's 0.1 µF bypass capacitor. I also built a version with no RF amp.
I built the Colpitts oscillator first, added the LC tank and then watched the signal amplitude and frequency in my 'scope + frequency counter as I turned the tuning capacitor. The old make a stage --- then test that stage thang.
Then I built the RF preamp,detector and AF preamp.
A 470K resistor isolates the Colpitt's parts from the front panel 10K DC bias (Colpitt's amplitude) control. The 22K resistor sets the maximum Colpitt's amplitude and the 3K3 R, the minimum. You may have to experiment with the 3K3 resistor to find the resistor value that allows the Colpitts to just barely turn off but not go to 0 VDC.
If you omit this resistor, you'll hear what it does -- as you slowly turn the 10K pot clockwise from fully counter clockwise, a "bump" sounds as the BJT turns on. You apply the nearest standard value resistor that just eliminates that bump; for me it was 3K3 Ω.
I omitted the 10 µF bypass capacitor 'tween the wiper and 470K resistor in my design from Makota's original design since it causes a small response delay when changing the 10K pot.
Detector and AF Preamplifier
I extended Makota's detector by morphing it to a hybrid cascode.The hycas detector hikes reverse isolation plus lifts the output AF voltage and impedance.
1 experiment worth considering: Remove the 6K8 source resistor and solder a really short lead to a 10-25K pot wiper and 1 outside terminal. While listening to some signals, adjust the pot to find the sweet spot yielding the best sensitivity + AF gain. Remove the pot, measure its resistance and replace it with a nearest standard value resistor. After that, you might try the same procedure with the 2K7 collector resistor while listening to some strong signals. That's how I came up with my values as shown in the schematic.
In regen #4, most of the AF voltage gain occurs in the detector plus the following feedback pair.
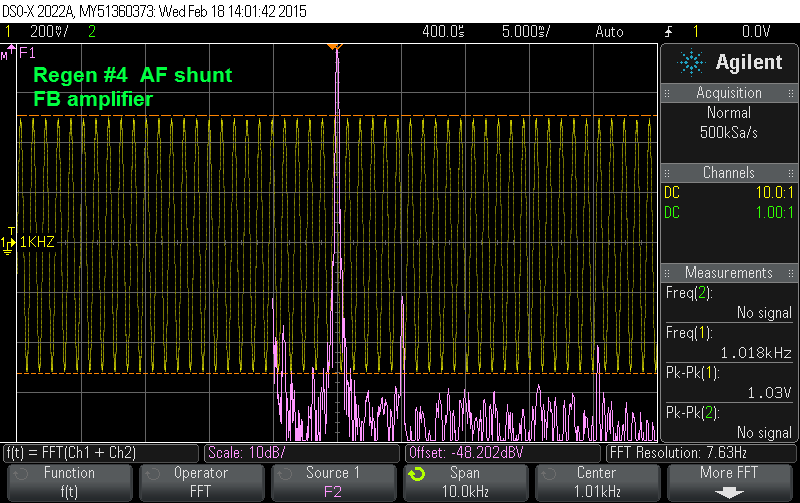
The shunt feedback pair is a low-level only, cheesy, popcorn preamplifier I often throw in my experimental receivers. While this preamp looks crazy and won't win awards for temperature stability, its harmonic distortion is reasonably low:
Above — An FFT of the regen #4 AF preamplifier @ ~1 KHz. The 2nd harmonic lies 52 dB down while all others are > 62 dB down. For low-level applications only. 2.52 mA total current.
You've noticed the 180 pF cap from output to input? Without a 100 - 220 pF cap in parallel with the 100K feedback cap to lower the preamplifier bandwidth, you'll hear audio oscillation.
DC Voltage
I ran my standard, homebrew, well filtered 12.2 volt DC power supply for my regen and heard no hum. Many prefer a battery supply and in that case, its a good idea to add a voltage regulator to keep a steady DC current in the Q multiplier and detector stages as the battery fades. Ensure you decouple and bypass well in any case.
Above — An example ripple filter used to scrub off noise from the DC supply. I might place this after a voltage regulator going to the Q multiplier and detector. If you use such a filter, a decoupling resistor plus bypass capacitor is still required in every stage of the receiver as shown in the regen #4 schematic.
AF Power Amplifier
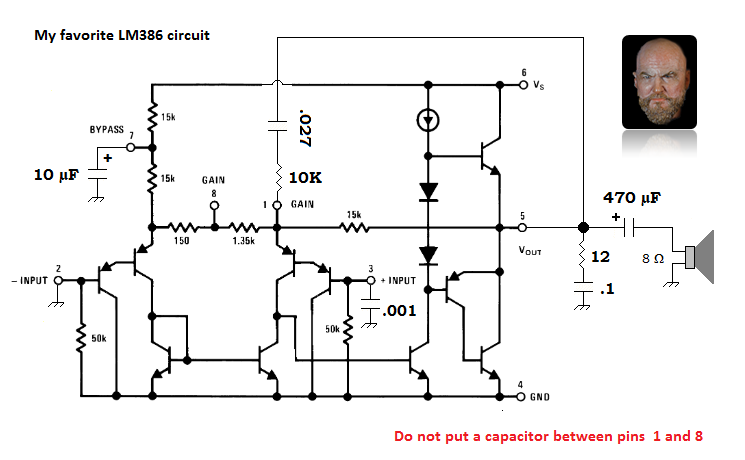
In most regens, you'll see a 10 µF or so capacitor between pins 1 and 8 of an LM386 — this cranks up the gain to 200 and with it; noise and distortion.
I'm going to make 2 bold statements: [1] The LM386 in the low gain mode with some minor tweaks makes a very nice audio power amp. [2] It's unlikely you could build an AF power amp with the same clean average power capacity having the same or less distortion.
Above — An LM386N-4 schematic with the needed bypass and feedback tweaks to make it sing sweetly like Montserrat Caballé. I showed the functional schematic earlier. Most LM386 users stick a capacitor between pins 1 and 8 which bypasses the 1.36K emitter resistor and this application (OK in some situations) resulted in the LM386 getting labels such as "a distortion machine", or a "compromise part". I continue to applaud the team that designed this part.
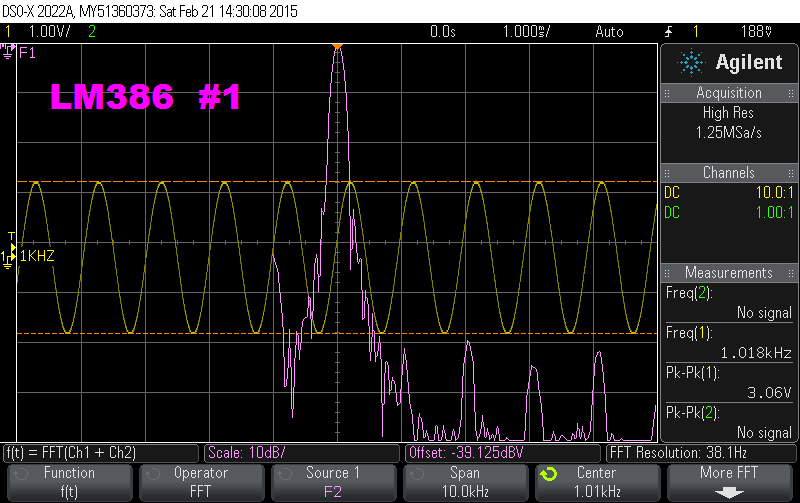
I've applied the LM386 like this for years, but have never shown any measures. Here we go:
Above — An FFT of an LM368N-4 driven with ~ 1 KHz sine wave to output 3.06 Vpp into an 8 Ω resistor load. The second harmonic is ~ 64 dB down! At this drive, the power = Vpeak ^2 / 2R -- so (1.53 * 1.53) / 16 = 146 mW.
This is roughly the clean power you'd get from a 2N4401/2N4403 complimentary pair; however, to get distortion this low would take some serious engineering, parts and measurement for the average Ham experimenter.
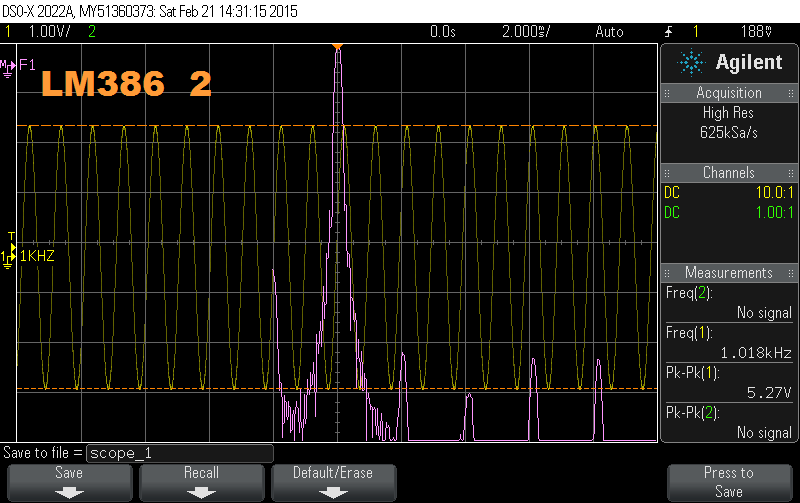
Above — I cranked up the drive to output 5.27 Vpp: Average power now = (2.635 * 2.635) / 16 = 434 mW. Look, the distortion remains low.
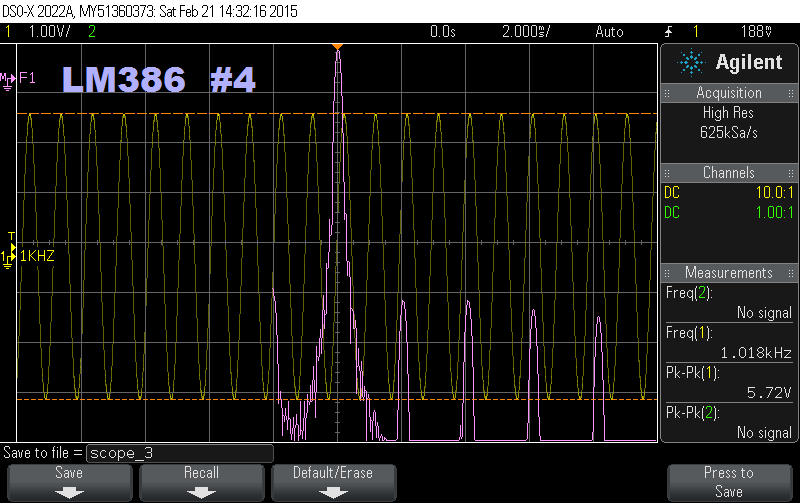
Above — The time domain output with my LM386 driven to the point where I can just detect signs of distortion: 5.71 Vpp or 520 mW.
Above — Adding back the FFT shows the harmonics are still down ~ 52 dB from the fundamental. Still reasonable distortion at over 1/2 W power.
Above — Pushing the drive to get obvious clipping of the sine wave results in a 2nd harmonic of -40 dBc. That's my threshold of allowable distortion tolerance in a popcorn radio AF PA. P = 599 mW. At normal room volume, you might get this on some stronger signal peaks.
The 4 controls on a regenerative receiver keep your hands busy. Some combination of those 4 tweaks will give you the best sounding audio and hopefully keep the signal level where minimal clipping of peaks occurs.
The LM386 seems OK in my book. If these experiments don't show the benefits of measurement, then I'm afraid nothing will.
In regen #4, my strategy included building up most of the the AF voltage gain with the hycas detector + a feedback amp using relatively low noise 2N4401 BJTs. The LM386 adds some gain, but minimal and the result is a popcorn, relatively low noise + distortion AF chain that sounds OK.
No question, some builders can build a better AF mousetrap and I encourage them. However, for a low-fi regen receiver, I posit the LM386 in low gain mode with some tweaks will save a lot of parts plus space and give reasonable AF into a speaker. As ever, you'll decide what works best.
Out Takes
Above —A double-tuned tank featuring varactors as the variable C. At some point, I'll couple it to a Q multiplier and take a look. I built a ton of regen-related circuits in Jan - Feb 2015. Great fun.
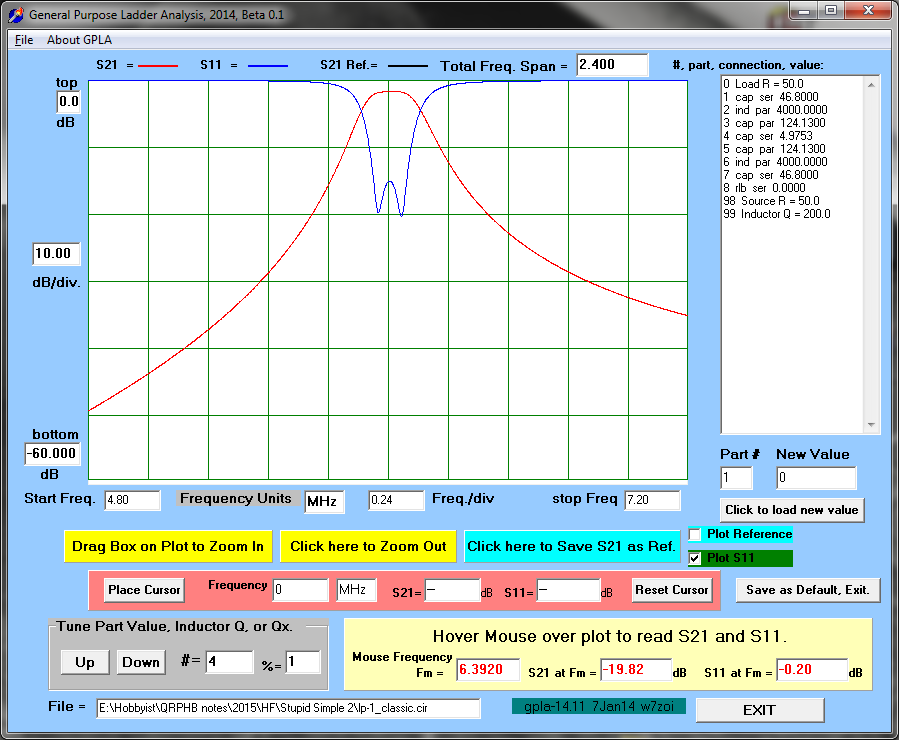
Above — A sweep of the above double tuned circuit tuned at 6. 37 MHz. The higher than expected insertion loss arose from the mismatch at the output end ( 29t : 10t ), plus the low Qul of the varactors.
Above — A GPLA generated transfer function. I designed the 49M band double-tuned circuit with the LADPAC software that ships with EMRFD.
Addendum:
A ton of people view this blog by clicking on links from Twitter. I joined up -- see My Links
Thank you
QRP-POSDATA for April 9, 2015
Please click here for an interesting thread post by 'Bear' NH7SR who built his own version of Regen #4
Also consider looking at the slightly tweaked version of the detector in Regen #5. Click here.
I prefer the common gate RF pre-amp in Regen #5.


