Search This Blog

Saturday 26 December 2015

RF Bypass and Filtration in a UHF VCO

Greetings:

I've spent >1 month studying frequency synthesis — a big subject that covers topics from writing code, to applying ECL + TTL logic — and finally making VCOs at VHF-UHF.

Some builders will buy a "1 and done IC" like the Si570, and that's great — but through QRPHB, I attempt to dive into more 'organic' design work @ the component level. It's great fun to play with prescalers, charge pumps, different order and styles of loop low-pass filters, phase and/or frequency comparators and the various schemes to divide down the feedback and reference frequencies. The theory and math in PLL loop filter design also challenges you. To me, the PLL = the ultimate challenging circuit to play with and learn about.

Also, over time, I hope to eventually develop up to ~10 GHz frequency synthesizers for my mostly ZIF receivers, but that's a long way off. Today, I'll focus on a UHF VCO and how some of the bypass caps and inductors were chosen to keep it stable.


Above — the discussion prototype VCO. You'll find this JFET VCO topology in newer Kenwood and Icom transceivers that give coverage into UHF. These radios use a PLL chip (such as the LMX2306) with an external PLL low-pass filter and VCO. Moving the loop filter and VCO off-chip presumably allows the engineers to lower VCO phase noise and to optimize the loop filter for various parameters including synthesizer phase noise. Further, for phase noise reduction, designers keep the VCO gain low but get a decent tuning range with higher reverse DC voltage applied to discrete varactors.
 
Since I'm using this VCO as the heart of a signal generator, my buffer design remains under  development — 1 signal gets low-pass filtered and then boosted to around +7 dBm for the VCO output, while the other gets boosted and goes to a ECL prescaler and then further divided by TTL logic in or outside a PLL chip. I'm still seeking the best strategy, but MMICs seem the easiest way to boost the signal level outside the VCO's metal container.

This VCO topology can easily tune >=30 MHz tuning bandwidth (from a 5-10 VDC PLL output), but in microwave terms it = a low bandwidth VCO. I don't have a need for a 1 octave VCO presently and lower bandwidth allows for the use of a higher Q, single turn, u-shaped loop of wire for the inductor + avoids the need for a frequency doubler for up to ~ 570 MHz from my experiments. I've built this VCO with both leaded and SMT JFETS. Cx varies the tuning bandwidth, however, @ UHF, stray capacitance weighs heavily along with your capacitor choices to determine the tuning range and signal amplitude. Even changing buffer circuit values may affect the oscillator function.

I built on double sided copper clad board with numerous copper via wires connecting the 2 surfaces. RF tight shielding and mechanical stability also factor.


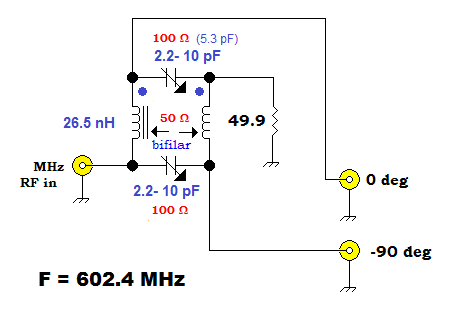
Above —The 2 channels along with the low pass filter shown applied to the (blue) main VCO output channel. The yellow channel gets digitized in an ECL pre-scaler chip and the frequencies tracked well.


Above — Blue or main VCO output channel in a spectrum analyzer to look at the 2nd harmonic @ 808 MHz [ -43.7 dBc ]

Bypass Capacitor

Which capacitor value to choose for RF bypass at ~400 MHz? With a tracking generator and spectrum analyzer, I swept a 100 pF capacitor.


Above — A size 0805 AVX 100 pF capacitor swept to determine its series resonant frequency. SRF = ~361 MHz with a 44.4 dB deep notch.

Wes sent me a bag of these ~ 8 years ago and they deliver a good notch (at UHF) due to a Q >=500 @ 1 MHz. A couple no-name 100 pF capacitors bought on a popular online auction site showed a notch depth of on only -35 to 36 dB due to their poor Q. I won't buy any capacitors that lack a datasheet and always sweep a few to confirm the datasheet specification.

Because they generally go with a series inductor and/or a resistor as a low-pass filter — even though the SRF lies less than 400 MHz — they will work OK.

For pure RF bypass alone, a smaller capacitor value such as 82 pF might make a better choice due to the SRF of this 100p cap @ ~ 361 MHz. Further, to raise the SRF, you can also go to a smaller capacitor package like 0603, but that's getting small for the over 50 builder with presbyopia. One 100pF, Johansen size 0603 cap in my collection exhibits a SRF of ~475 MHz at a notch depth of -44 dB.


Above — A sweep of a size 0805 "ultra high Q"  Vishay cap. Special high Q caps get expensive — and I normally reserve them for bandpass filters and applications where I'm really going for Q. The notch lies 5.36 dB deeper than the AVX capacitors shown above. Normally, you'll see a notch boost of 8-10 dB with a special "high Q" SMT cap compared to a garden variety SMT cap. This shows that those AVX caps Wes sent me are quite good and suitable for my work.


Above — A sweep of a leaded MuRata MLCC 50v C0G capacitor with the leads cut quite short. The SRF dropped by ~ 131 MHz.

In my VCO schematic, the JFET drain DC voltage needs power supply decoupling and filtration. A series 470 nH choke and a 51 Ω resistor bypassed by 2 different cap values serves that function. Here's some experimental details of the individual components and — then finally, the finished network:

Chokes


Above — A sweep of a through-hole, low Q ( less than 30 @ 1 MHz ) axial 1 µH axial RF choke. You see these a lot in homebrew radio projects. They resemble a color-coded resistor and work ~ OK at HF in some applications.
No deep notch. Note the generally shallow wideband response so typical of these @ VHF - UHF. We seek something with a little more Q up at UHF.


Above — A sweep of a 470 nH wire wound SMT choke that exhibits a 49 dB notch at 292 MHz. This wire wound choke's self-capacitance drops the SRF well below our target of 400 MHz. I've noticed from sweeping many chokes that the nH value often precludes intuition of the SRF. For example, a 68 nH device may exhibit a lower SRF than a 220 nH device. Things really vary from manufacture to manufacturer. For chokes at UHF, I've learned all that really matters = SRF and Q — and a datasheet and/or a sweep is the only way to learn this.


Above — A sweep of a wire wound 220 nH Coilcraft coil from my collection. Beautiful part!

Above — A snippet from a Coilcraft datasheet. Based on the performance of the 220 nH choke shown just above, I ordered 100 of the 330 and 470 nH values today. Note the stout maximum current — these will work well for MMIC decoupling too.

Pi filters

As mentioned, for filtering our DC lines, we usually apply series resistors or chokes plus bypass capacitors.


Above — A sweep of the pi filter: the 100 pF bypass cap on either side of a 51 Ω resistor. The deepest notch lies at ~223 MHz. while this filter may work OK --- how might we boost the notch and filter bandwidth?


Above — A sweep of the pi filter with 1 capacitor increased to 470 pF. This boosted the filter bandwidth + the attenuation at ~ 200 MHz. 
 

Above — A sweep the pi filter with 1 capacitor increased to .001 µF This boosted the bandwidth + the attenuation at  ~ 400 MHz. Further, we've extended the attenuation to 128 MHz with a notch of 41 dB.

This gets you thinking. If we combine the filter above with a series choke exhibiting a reasonable Q at UHF — can we extend both attenuation and bandwidth?


Above — Yes.  A sweep of the FET drain DC supply filter applied in the 400 MHz VCO shown in the first figure. By combining the series resistor, choke with decent Q and 2 different bypass cap values, a really nice filter emerged. Love this.

Further, 220 µF caps lie in shunt with the 1 nF RF capacitors on the DC rail. I boosted the 1K resistor to 1K to limit FET current and this further drops the filters' lower 3 dB cutoff @ AF + RF.

The end result = a well filtered DC rail. AF ripple can modulate the VCO and RF parasitics could also add unwanted modulation or noise + instability.

One problem still vexes me: my 470 nH choke with a SRF of 292 MHz gets applied as the DC return path for the varactor anode and on the FET drain. I really want the SRF closer to 400 MHz (just above is better).  For the varactor DC return, a high value resistor might work. Further, I could just wait until my ordered Coilcraft 330 + 470 nH chokes arrive. I can't wait to sweep these parts.


Above — A sweep of a source resistor (originally 150 Ω) and choke that goes on the FET source lead. I'm losing a little signal to ground due to less than ideal attenuation @ 400 MHz, however by raising the resistor to 390 Ω, losses were minimized I can adjust the FET current by tweaking the drain resistor when I bias each FET in this VCO design.

Measurement and problem solving on the bench poses my favorite activities in this hobby.

Thank you!

QRP-PosData --- January 5, 2016 ---   Miscellaneous


Above — Synthesizer / PLL books.  For basic PLL math and theory, anything by Roland Best will help you. I also enjoy the blue book shown written by P.V. Brennan.  In Introduction to Radio Frequency Design, Wes, W7ZOI wrote a great chapter on frequency synthesis for those who need a good primer (now out of print).


Above and below— MC145151. I'm always about 2-3 decades too late in this hobby. But the fun never stops with these relics. I only build to better understand electronic design — and not just to make stuff.


Above —My pre-scaler  and MCU collection slowly grows.  You might not imagine how much fun + learning these parts provide.


Above and below— Example discrete circuitry experiments I'm working with to learn the ropes.


Monday 9 November 2015

That 90 Degree Phase Shift

Salutations!

Minor update June 27, 2022.  I added a new working link to Ken Kuhn's spreadsheet, removed the link to the now defunct R2Pro / KK7B Designs Yahoo group, plus edited a few words.


After much thought, I'll focus my further receiver efforts on analog domain phasing receiver design and construction. While great tools, superhet receivers lost their luster for me. Plus, I'll no longer have to deal with birdies, crystal filters, RF mixer products and the IF image.

Quadrature detectors with digital signal processing don't excite me either, however, that may change over time.

For over 40 years I've listened to detected RF through a speaker — enjoying mostly hi fidelity audio. In 2015, I find no reason to change my preferred listening practices. To that end, direct conversion, or zero-IF ( ZIF ) receivers deliver a sonic impact that I don't seem to get with my superhets. Further, digital processing may be applied along the ZIF receiver chain as I eventually modernize my analog dominant, primitive, hobby radio experiments.

Good DC receiver design poses many challenges; especially when you apply phase shifting techniques to suppress the unwanted side band by > 30 dB. Effectively reducing analog gain and/or phase imbalances between the translated I and Q baseband signals without relying on digital signal processing proves no small task. Unrelated issues such as DC offset due to local oscillator leakage also lurk.

How do we obtain a precise, wide band 90 degree phase shift at RF — and also at AF? Presented are some of my first experiments at making 90º analog phase shifts from AF to UHF.

As a 90 degree phase shift newbie, reading the material written by Rick, KK7B published in EMRFD Chapter 9 formed my inaugural task [ Reference #1 ]. Since older cell phones and many other receivers apply ZIF I-Q techniques, we may also find numerous online resources to read.

[1]  RF Quadrature Hybrid


I started with the classic 7 MHz "Fisher" quadrature hybrid [ Reference # 2 ] also presented in EMRFD Chapter 9.


Above — We've seen this 3 dB quadrature hybrid schematic in many ARRL articles for 7 MHz.


Above — I quickly built the above 3 dB hybrid with no special attention towards matching the 2 capacitors, or even building a precise layout. I wanted to measure it as a 'typical' build that a beginner might ply. We're so use to Y/T scope graphics that this lovely, round, Lissajous curve from an X-Y plot jumps out at you. This 7 MHz twisted wire 3 dB hybrid coupler works like a charm.


Above — Some Y/T DSO analysis. I measured the insertion loss @ 3.02 dB at Fc. To classify the bandwidth I adopted what I saw on a few datasheets: +/- 10% of the center frequency. I determined my Fc @ 7.060 MHz and felt surprised with its performance.

Like what I've read in the literature, signal amplitude varies much more than phase between the 2 ports as you move up and down in frequency. It's 1 thing to read information  — and something entirely different to see it happening before you eyes during real bench experiments.

This simple quadrature will work for the whole 7 MHz Ham band in many phasing receivers.


Above — I wanted to see how far up I could take the twisted wire quadrature in frequency.  I
  1. Twisted 2 wires together.
  2. Smashed up a T30-12 toroid inside a plastic sandwich bag with a hammer.
  3. Made a slurry of glue + Fe material and dabbed it on the center of the twisted wire.
  4. Measured the L at 26.5 nH and calculated that XL = 50 Ω @ 602.4 MHz.
  5. Crudely built a tiny 3 dB hybrid with trimmer capacitors to get the needed XC of 100 Ω.

Above — DSO analysis showed that it worked!  Some brief experiments seemed to indicate that a reasonable bandwidth might be possible if careful UHF breadboard practices were applied. I chose Fe material from the T30-12 since it had the lowest permeability of any toroid in my collection. Perhaps, my next experiment should involve no ferrous material?

Commercial 90 º splitter / combiners are available for multiple frequencies. Click for 1 example.

Branch line UHF Quadrature Hybrid

I wanted to make 3 dB quadrature hybrid for ~435 - 438 MHz: the ~ 70 cm amateur satellite band.

Commonly, builders insert a 90º λ/4 transmission line delay to make a power divider. Although these lack port isolation, they're theoretically easy to do.

To explain, I’ve never enjoyed glad outcomes with cutting and fitting λ /4 coaxial transmission lines on indoor bench projects — the likely outcome = leave the lab. That’s out for me. I'm told that semi-rigid hard line is easier to work with, but the cost seems prohibitive.

Another commonly applied transmission line structure = the 2 branch quadrature hybrid with
transmission lines made from coax, strip line or microstrip.  Although appealing — for me, at least,  lower UHF = no person’s land because λ is too large to make practical size circuits.

In my opinion, microstripline transmission line techniques seem best suited at and above 2 GHz where the boards get reasonably small to fit into standard radio enclosures.

I thought about carving a classic 90 degree, λ/4 branch-line 3 dB coupler on a copper board, but, as mentioned, it’s too big for my liking. Another option includes making a reduced-size branch-line coupler with a capacitor tuning each arm's end. That’s what I did.


Above — My basic design. The reduced-size branch-line coupler offers lower bandwidth than  versions built with proper λ/4 branch-lines.


Above — My Ugly branch line coupler build. Hand carved outdoors with a motorized tool in the wet, cold, fall weather, it does not look too pretty. Function always trumps looks in my book. This was my second version and featured 2-sided FR-4 board with some removal of the top side ground plan around the branch line paths. I connected all top ground plane sections to the lower copper ground plane with copper via wires.

 Above — I initially tuned it at ~436 MHz with an X-Y plot on my DSO


Above — Analysis showed the best bandwidth and phase match occurred with the hybrid centered at 438.6 MHz — presumably due to measurement + cutting errors. Bandwidth was low, but I could tune the entire ~70 cm Amateur satellite band with reasonably tight amplitude and phase balance. At least I've got something to start experimenting with and — gained a little experience up at UHF.


[2] Audio Frequency 90 Degree Phase Shifting

Rick, KK7B and others wrote that the I - Q baseband phase + amplitude imbalances in our RF quadrature hybrid and down converting mixers +/- first AF amp output ports may serve as deal breakers for getting maximal opposite side band suppression in ZIF phasing receivers.

With further reading and thinking about this on my plate, I'll just focus on the op-amp, all-pass 90 º phase shifter block applied between the post mixer (+/- first AF amp) I + Q channels and the combiner.

To start with, I designed and built a simple, low bandwidth, add-on 90º phase shifter for my 1 KHz bench audio signal generators:


Above — The schematic for my 1 KHz 90º phase shifter. The 10 nF capacitors were 1% tolerance. I show the calculated resistor values, however, for other than the 10K gain/feedback resistors, my build resistors were standard value 5% types.

Likely over-designed, I quickly built this on a whimsy to get me going with all-pass filter design. In most all-pass filter work, you've got to design it — and then order and wait for your 1% resistors to arrive. No lag for me: I went from design to test in about 2.5 hours. Previous to the experiments on this page, I'd never even thought about all-pass networks — now I feel excited to learn about and work with them.


Above  — Assessment of my narrow band phase shifter. I got pretty close to the design phase error by sorting through my 5% resistors with an ohmmeter and choosing time constant Rs as close as possible to those specified in the schematic. I might order some nearest standard value 1% Rs and see if I can get under 0.1% phase accuracy @ 1 KHz.

Now, along with boosted confidence, I've got something to connect to my AF signal generator for simple assessment of the wide band all-pass networks I build.


 Above  — 2 more photographs of the 1 KHz phase shifter.

Wide band All-Pass Phase Shifters


Above  — The general form of wide band all-pass filters applied in analog phasing receivers.
The R-C time constant gets fairly critical if you want the maximum possible opposite side band suppression, so buying 1% parts ranks as important.

The most important task for me was to re-read EMRFD Chapter 9.  I can find no greater reference with both mathematical and experiential writing. From discussions in the R2Pro / KK7B Designs Yahoo group I learned why Rick chose an all-pass bandwidth of 270 to 3600 Hertz with 0.1% amplitude + phase error.

I won't repeat it, but getting the phase shifter bandwidth as wide ( & flat) as possible; plus comparing various bandwidth all-pass designs with an antenna + speaker attached = key learnings. Rick's filter presented as Figure 9.56 in EMRFD remains a proven, widely reproduced, go-to, all pass network for many.  I ordered all the 1% resistors yesterday.

It's also heavy to learn that all opposite side band suppression occurs in the op-amp combiner that immediately follows the all-pass network.

I wanted to try designing some wide band all-pass networks to learn more about them.


Above  — My single resource for AF filter design: Electronic Filter Design Handbook by Arthur B.Williams. [ Reference # 4 ]. That book and Handbook of Filter Synthesis by Анатоль Зверев (1967) serve as the archetype references for analog filter designers. Get them.

Although you can buy software to crunch the math and design wide band, all-pass filters, there is something so organic about looking at tables and grinding out maths with a scientific calculator.

From the Williams book, I designed some filters with various bandwidth from the α constants and method provided.
 
Above  — The design of a 250 - 3000 Hz all-pass filter that fits the 3 section per side, all-pass filter template shown earlier.  My raw R values were substituted with nearest standard 1% metal film resistor values from a Vishay Dale precision resistor decade table.

Ken Kuhn wrote an Excel spreadsheet that plots a graph based on the RC time constants at R1 to 6. He later improved the spread sheet so you can just enter resistor and capacitor values for 1 to 3 all-pass sections.  Thus you don't need to calculate the time constant as shown in my work.

Ken granted permission to share the spreadsheet. Click for his file.


 Above  — The graph of my filter shows too much slop below 2 KHz


Above  — The beauty of his spreadsheet = tweaking. I inputted my raw, calculated R1 - 6 values then tweaked R1 to get this lovely transfer function. I will try tweaking with 1% resistor values next.

2 weeks ago I didn't know anything about all-pass filters, now I'm able to at least mathematically design them and more importantly, understand a little about them.

The  Table 1  α1 - 6  constants will pretty much work at any reasonably wide bandwidth where you want to get a +/- 0.1 % phase error. You must use 6 total op-amp sections like the all-pass filter template shows.

I plan to experiment to learn more about ZIF receiver topics including the Weaver method of processing the I and Q channels. The material published by Matjaž, S53MV about his ZIF receivers plus his other designs serves as great inspiration to me.

My special thanks to Ken Kuhn for writing and sharing his spreadsheet; Rick, Allison and others on the R2Pro/KK7B Designs Yahoo group —  and to you for reading my blog.

References

[1]  Experimental Methods in RD Design (EMRFD) First published by the ARRL in 2003. Wes Hayward, W7ZOI, Rick Campbell, KK7B and Bob Larkin, W7PUA.

[2]  Twisted-Wire Quadrature Hybrid Directional Couplers for QST, January  1978. Reed Fisher, W2CQH.

[3]  Free TI Software to design op-amp filters. Click. I used this to design my 1 KHz all-pass filter.

[4]  Electronic Filter Design Handbook. Arthur B. Williams.  McGraw-Hill 1987.

[5]   From Thomas, LA3PNA : Sage wireline.  Basically, just 2 twisted pieces of wire in a piece of copper tubing. Some enamel wire in a thin KS brass tube should do the trick in a homebrew version. I believe it could be coiled up if the total length is to long in a given space, the important part should be that the tube is grounded at both ends.  Found this note about the length in ADS:  The quarter-wavelength frequency is calculated as:  F (MHz) = 1850 / L (inches). Click for wonderful instructional sheet with math + photos.

Thursday 29 October 2015

QRP WorkBench Line-in Audio Amplifier — Part 2

Welcome to Part 2

I share some experiments, plus a few thoughts & observations from my QRP workbench.

[A]  Some general points in AF design and breadboarding

[1] Expect your amplifiers to oscillate and design to mitigate this.

[2] Read your datasheet(s).

[3] As possible, identify the frequency of any parasitic oscillations by measurement. If you lack a 'scope, you can’t hear HF oscillations, but may hear their outcomes — or view their effects on DC measures like quiescent current.

[4] Going for high gain in a single stage may bring you pain.

[5] Build a homebrew, low noise AF signal generator with an amplitude control pot — if only for 1 frequency such as 1 KHz. Your sure to benefit from the experience designing for and soldering on op-amps.

[6] Test your AF boards before inserting them in a receiver.

[B]  AF + HF Decoupling and Bypassing

For this discussion, I placed an LM386 in high gain mode ( 46 dB power gain ) and measured the output signal across an 8 Ω load resistor.


To show what can happen if power supply Pin 6 is unbypassed; or inadequately decoupled and bypassed @ AF,  I left off the usual Pin 6  R-C low-pass filter network. Vs = 12.3 VDC.


Above — 144.6 Hertz oscillations erupt with no input signal applied by my signal generator.

Insufficient power supply filtering allows low frequency noise to make it from the output into the input via the DC power line where that feedback path contributes 180 degrees of phase shift to the 180 degrees provided by the inverting amplifier.  If the gain at the oscillation frequency >=1  you'll hear (and see with a 'scope ) AF parasitic oscillations.

The quiescent current of an LM386 powered by 12 VDC ran  5.6 - 6.2 mA in my Lab. I measured the current with the parasitic oscillations seen above and the quiescent current rose to 13.2 mA. A higher than expected quiescent current may signal parasitic AF - HF oscillations in an AF stage.


Above — I put a 1 KHz signal into that LF oscillating LM386 input.


Above — An FFT of above.  Looks and sounds nasty!  F0 = 1.015 KHz.


Above — A 470 µF AF bypass electrolytic capacitor was soldered to Pin 6, plus a 10 Ω decoupling resistor inserted between the power rail and Pin 6. Further, I AF bypassed the B+ rail with 100 µF.


Above — The averaged noise voltage at the LM386 output after adding the DC line low-pass filtration shown above. Parasitic audio oscillations killed dead!


Above — 3 different DC power line filtering R-C networks set up for analysis in a 50 Ω system. In our AF amplifiers, we need to worry about parasitic HF oscillations in addition to AF parasitics.


Above — A tracking generator plus spectrum analyzer sweep of Figure A.  The analyzer doesn't measure below 9 KHz and unfortunately doesn't assess the 470 µF capacitor. However, from other experiments and calculations, the 470 µF plus the 0.1 µF give a good wideband bypass for AF to HF.

The reference sweep is the red horizontal line above [ 0 dB attenuation of the signal ]. When inserted between the TG + SA, the 0.1 µF cap exerts it's ultimate attenuation of the signal at 5.8 MHz ( -44.3 dB = peak attenuation).


Above — TG + SA sweep of Figure B. Now we've got a classic pi filter with shunt capacitor(s) on each end separated by a 10 Ω resistor.  Peak attenuation = 8.04 MHz. Notice how the pi filter deepens the ultimate attenuation of the 0.1 µF and gives better RF bypass than just a single capacitor with no decoupling resistor.
This rings true for both RF and the AF bypass capacitors.


Above — TG + SA sweep of Figure C.  R now = 100 Ω. The peak attenuation occurs at ~12.1 MHz and has flattened out even more to provide better RF bypass across the span. This is why we decouple and bypass the DC lines in our RF projects too.


Above — To get better DC filtering @ HF in AF amplifiers, we ought to put a at least 1 HF bypass capacitor on our positive supply rail to make the classic pi filter. In Figure A, I've placed AF + HF bypass on both sides of the 10 Ω decoupling resistor. We're radio builders and don't want parasitic AF or RF flowing down our B+ lines and wreaking havoc in our AF or RF stages.

For op-amp DC power supply pin AF bypass, 22 µF works well in my Lab, however, you've got to find what works best from your own experiments.  

At Figure B, the 10 Ω resistor is shown as optional. Since the power followers draw significant current for speaker-level volume during signal peaks, the voltage drop across the 10 Ω resistor might reduce clean signal power a little. I tend to leave off the 10 Ω resistor and only include it if I measure AF instability that I can't fix by increasing the value of the C within reason.

I've encountered AF parasitic oscillations with a 100 to 220 µF bypass capacitor in my power amplifier stage designs that was stopped by going up to 470 µF — now I just stick 470 µF in as my default AF bypass capacitor and work from there. On my bench, at least, higher gain PA stages tend to oscillate more. I strive to keep the power gain of my PA stages <= 26 dB.

Choosing gain, cap and resistor values are decisions we designers must face during every build. Consider thinking critically and choosing carefully — don't just copy what another builder did, because that builder might have copied someone else and so on. Some times unmeasured 'minimal part' designs that seem attractive dole out maximum grief and ruin your bench experience. Bench time should foster fun and discovery.


Above — A JavaScript applet screen shot from my blog  You've go to decide what R and C values to use for AF bypass and to decouple your DC power lines. I tend to ply lower Rs and higher C's to minimize DC voltage drops to preserve headroom. From the example above, if you applied a 100 Ω resistor, then only a 47 µF capacitor is required for the same 3 dB down frequency.

Yes, our parts collection often dictates what choices we make, but if you're buying parts — a  470 µF/25v capacitor often costs just pennies more than a 47 µF/25v capacitor — especially with low-cost parts offered by on-line stores and auctions.

[C] HF Oscillations 


Above — Intense HF oscillations from a 5532 op-amp circuit. I collected this and the other images over the past 2 years.


Above —  I didn't think this was possible — 10 MHz oscillations in an op-amp + power follower AF stage. The stage quiescent current measured ~ 65 mA just from these parasitic oscillations.


Above —HF oscillations in a LM4562 based op-amp tone circuit driven with a 1 KHz AF tone from my 1 of my homebrew audio signal generators.


Above — Techniques to remove HF oscillations. Decoupling and bypassing at HF previously discussed in Section [B]

Figure A — The input of any AF chain, or IC like the LM386 should contain RF bypass to ground. You might also choose that capacitor's value to shunt some of the higher frequency noise and signal to ground like a low-pass filter.

The output of the LM386, like most power amps, contains the familiar R-C ( Zobel ) network connected in parallel with the speaker voice coil. I recommend adding this to all PA output stages.

Since a speaker load presents a complex impedance, placing the Zobel network in parallel with the voice coil keeps the amplifier happy since it's a purely resistive load.  The resistive load boosts the PA's stability and in some high power, more sophisticated IC power amps, helps to eliminate negative voltages that could harm the PA.

Figure B — In high gain feedback amplifiers, it does not take much time delay, or phase lag to trigger high frequency oscillations near the upper end of the op-amp's bandwidth.  I've noticed 2 cases where this is more likely to occur: in op-amp driven PA stages, and also in some tone control circuits. I applied 20 pF for Cx in the tone circuitry applied in my line-in AF amp from Part 1 of this blog posting.

Figure C —  Similar to what's shown in Figure B; a small value feedback capacitor Cx lowers the closed loop bandwidth so there's insufficient gain at high frequencies for oscillation to occur. As aforementioned, in some stages you might create a frequency dependent situation where the total phase shift in the feedback loop exceeds 360 degrees and has gain larger than 1 which = unwanted oscillations.  Feedback capacitor Cy lowers the op-amps upper cutoff audio frequency, and as an added benefit, its noise bandwidth.

In typical complimentary emitter follower power amplifiers, this works well. An example = Figure 9.74 by Rick, KK7B shown in EMRFD. In my particular PA from QRP WorkBench Line-in Audio Amplifier — Part 1, too high a cap value will actually trigger HF oscillations.

[D] Environmental Noise

Noise sources may affect your measures. To conserve energy, I purchased an LED light bulb for my new workbench. I knew these things used switched drivers, but wanted to 'go green'. Bad mistake. I'll show you some cool DSO traces measured during some AF design work.


Above — I went to measure the noise voltage across an 8 Ω resistive output load of a PA with no input signal, plus a 470 Ω shunt resistor across the input. I could not figure out why my stage measured so crazy noisy!


Above — With some DSO averaging, this signal looked like my noise was modulated by a regular occurring oscillation of unknown cause.


Above — Finally, it occurred to me: it's probably the LED lamp above your work. I switched the LED bulb off and instantly the modulated noise stopped. Yikes!  I gave the bulb to a friend who lives across town.


Above — The LED bulb modulating an HF oscillating LM4562 op-amp circuit.


Above — That wretched LED bulb even modulated a low-level UHF circuit.  It's gone for good.

[E] LM386 Musings

Let's unpack the LM386 a little. It's a great design that finally went end-of-life this year. Over the years of web publishing AF stuff, this humble part provided me with many emails and many wanted to use it at 46 dB gain to eliminate the need to make a preamplifier — or as a space saver so they could stuff their entire project into a mint tin.

If you manage to build a high-gain mode LM386 AF amp without hum and parasitic oscillations, you may notice it gives some crunchy harmonic distortion when driven anywhere towards loud. My question = why?

I performed a ton of experiments and saved over 50 files. The tough part was writing something that made sense and stuck to the measures and facts. When we don't know facts, or information based on reliable measures and data, we often just get opinions : they're free on the Internet.

LM386 with Power Gain = 46 dB      "High gain mode"


Above — The best 2nd harmonic distortion possible even when driven to only 11.8 mW. In high gain mode, the harmonics do not clean up at low drive levels like other AF PA circuits I've tested.


Above — I drove this particular LM386 to 2 Vpp and 6.82 Vpp and we'll use those 2 voltages  to compare this to the chip with 26 dB gain (low gain mode). At 6.82 Vpp (or 727 mW) the sine wave starts to show obvious distortion, so I chose this as a benchmark since many builders don't have access to FFT.  The load = an 8 Ω resistor bank.


Above — Sine wave in time domain driven to 6.82 Vpp. I can just see the positive tip starting to distort. It's easier to do this live by bringing the waveform in and out of distortion repeatedly. From practice, I can usually see sine wave distortion when the 2nd harmonic lies >= -44 dBc — and especially when the 3rd harmonic moves towards this level.


Above —The FFT of the above sine wave. The third harmonic lies about -43 dBc.

LM386 with Power Gain = 26 dB

I set that LM386 to minimum gain mode by removing the capacitor between Pin 1 and 8. Lets see how it compares to the above measures @ 2 and 6.82 Vpp.


Above — The FFT when driven to 2 Vpp. Compared to the high gain mode, the 2nd and 3rd harmonics are ~ 7 dB and 5 dB lower respectively.


Above — The FFT driven to 6.83 Vpp. Compared to the high gain mode, the 2nd and 3rd harmonics are about 3 dB and 6 dB lower respectively.

From these 4 FFTs, I can't see why I seem to hear more distortion in the high gain mode version since the 2nd-3rd harmonic differences are <= 7 dB. Or, maybe that's enough of a difference to hear?

Perhaps it's just easier to overdrive a high gain LM386 in real life receiver testing? Consider to, I don't run AGC in my receivers, so my louder RF signals do sound louder. I'm pretty certain the distortion doesn't occur in my receiver front end, since I've heard it on peaks with attenuators switched in — and also in my high performance front-ends, plus non-radio projects.

Finally, here's an old experiment that makes no direct comparisons to any other LM386 configurations.


Above an  LM386 schematic and its FFT:  If I do run an LM386 AF PA in a receiver, I build a low noise (preferably op-amp) preamplifier and drive the LM386 in the so-called bass boost configuration as shown in the schematic just above the FFT.

An R-C network provides negative feedback from the output to the emitter of the input PNP transistor via Pin 1. I've noticed that in this particular configuration, as you lower the drive level, the harmonics clean up ( unlike what happens in the high gain mode and much better than in plain low gain mode ). In the above FFT, please view that all harmonics are 60 dBc down @ (and below) 235 mW output power.

I also bypass the point between the two 15K emitter resistors of the grounded PNP of differential pair @ Pin 7. This bypasses any DC line noise/ripple to ground.

Wait.  Now I'm getting it.  I don't just prefer the LM386 in low gain mode; I also prefer it with negative feedback. Good old negative feedback!

I'll let you draw your own conclusions about how and when to employ the venerable LM386. 

OK, enough ranting  — back to the bench!

Click for Part 1.